DIY Closet System Tutorial
- Noell Jett
- Mar 5, 2020
- 3 min read

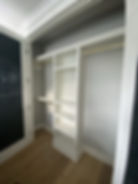
While we were building our new house, we decided to put off some of the smaller projects until we were already moved in. This allowed us to focus our time and energy on getting the house to the Certificate of Occupancy faster. We have now officially been living here just over three months and are slowly knocking things off the to-do list one by one! We just finished our second daughter’s closet system and after all the love our first closet system received, we tried to do a better job of actually turning this one into a tutorial vs just a video showing us doing it!

Closet systems are hard to turn into tutorials because every closet is going to be a different size and every person is going to have different needs and desires. The main point here is to show how easy this is and to inspire you to try to create your own! You can modify the center system, the hanging lengths, you can make it whatever you want, but for the sake of this tutorial, I’m just going to tell you exactly what we did. If you have a similar shaped closet and desire a closet system with the same features, simply modify the cut list to fit your closet. These tutorial is based on a 96″ x 7′ system. Each hanging system is 36″ and the center is 24″, you can easily modify this as desired.
You can save yourself so much work by having the cabinetry grade plywood cut down to a 12″ width at your local hardware store. From there, you simply cut it down to your desired length.
As you can see in the video, remove any base that is in the way. Carefully measure out your closet. Find your middle point and plan your cuts from there. Go ahead and make all your cuts so the install will go faster. When you are ready to install, you want to start in the middle and work your way out, making sure to use a level to keep everything straight and even.
To begin, start with A- (2) 84″x12″ and place the B- 96″x12″ on top. Attach everything with wood glue first for extra stability (especially if you have younger children who may be crawling on it) and then with a nailer and finish nails.
Next, you will want to attach C- 24″ 1″x8″ across the bottom of your vertical boards.
Then place (2) of D- 10″ 1″x2″ on the inside of the vertical boards to serve as braces for the shelf you are about to install. Do not install them level with your 1″x8″, remember the shelf is 1/2″ thick so you’ll have to leave room for that 1/2″!
Once the braces are set, install your first E- 24″ plywood piece.
Continue installing the other 4 E- 24″ pieces, setting them at your desired heights.
Next, install F -36″ plywood, placing a D – 10″ 1″x2″ under either side for support.
Install G -36″ 1″x2″ across the front of F to beef it up
Then add H – 24″ 1″x2″ across the front of E’s. Also, add the (2) 84″ 1″x2″‘s to the front of A’s.
Add I – 96″ 1″x2″ across the front of B. Your base system is almost complete!
Add J – 10″x6″ in the appropriate places to add additional support, then attach your rod anchors. Set poles into place.
Finally, set your 96″ crown moulding into place across the top of B, nail into place.
Caulk all joints. See the below video for tips on properly caulking your project!
13. Once you are done caulking, allow to dry for at least one hour then, paint everything! We used Sherwin Williams Alabaster in a semi-gloss finish. Allow to dry overnight and then enjoy your handiwork!
Material List
Cabinetry Grade Plywood
Crown
1″x8″‘s
10″x6″‘s
1″X2″‘s
Base
Nailer
Nails
Wood Glue
Caulk and Caulk Gun
Hanging Rod
Rod Anchor
Cut List- Based on a 96″ X 7′ Closet System
Plywood:
A- (2) 84″x12″
B- (1) 96″x12″
E- (5) 24″x12″
F- (1) 36″x12″
1″x2″
(2) 84″
D- (14) 10″
G- (1) 36″
H- (4) 24″
I- (1) 96″
1″x8″
C- 24″
(3) 36″ Poles
10″x6″
J- 6